The Transaction Details screen provides detailed information for a selected transaction and allows you to perform a variety of tasks for the transaction. What you can view and the tasks you can perform depend upon your permissions within the system. A Transaction consists of several elements related to the business matter which it represents, including:
- Data Set - containing all data collected about the transaction through one or more interviews.
- Documents - related to the transaction generated through associated system templates.
- Ancillary Files - uploaded to the transaction record to be stored with the transaction. This may also include a manually edited DOCX document that was derived from a system generated document in which case the manually edited document will become the latest version of the matching system document.
- User Notes - associated with the transaction.
Accessing the Transaction Details Screen
To access to Transaction Details screen, first log in to the Document Agility system using your login credentials. Then from the My Workspace screen, click on the name of the transaction with which you would like to work. You will then be taken to the Transaction Details screen for that specific transaction.
You can also access the Transaction Details screen by click on the name of a transaction within the Transaction Explorer and Transaction Search screens.
General Transaction Information
The top section of the Transaction Details screen provides general information about the various attributes of the Transaction. It also allows you to change some of these attributes.
 TIP - In order to edit general attributes of a Transaction, you must be its owner. This is done by Taking the Transaction (as described below).
TIP - The actions you can perform on any given transaction may vary based upon the transaction type and the permissions of your User Group.
- Transaction Name and Description - When the given Transaction was initially created, the User creating it was required to provide a name for the Transaction. Names do not have to be globally unique, so when referring to a specific Transaction within your organization, it is often best to identify the Transaction by its transaction ID. The transaction description, which appears on this screen below the transaction name, is optional when creating a new transaction.
To change the Transaction name, click the Edit Name button, then enter a new name and click the Save button. If you do not wish to make any changes, click the Cancel button.
![]() WARNING - When changing the name of a Transaction, you may not use the "/" or "\" characters because they are often reserved keywords in document management systems.
WARNING - When changing the name of a Transaction, you may not use the "/" or "\" characters because they are often reserved keywords in document management systems.
- Type - The transaction type is selected when the transaction is initially created and controls the interviews presented, the documents that can be created, the workflow and the User Groups that are able to create transactions of a specific type. Transaction types are established by your organization's Content Provider and reflect the types of business transactions your organization creates.
- Version - Transactions generally have specific life cycles. They are created, edited, memorialized, then later they may be updated or amended. The Document Agility system uses a convention of marking transactions as being Finalized in order to indicate that they have been memorialized externally in some way - sent to a regulatory agency, signed by a client or vendor, etc. Once the System Status of a transaction is marked as Finalized, any further changes to the interview will automatically create a new version of the transaction. When a new version of a transaction is created, the existing Data Set and all existing documents for the previous version are stored.
You can view the version history for the Transaction by clicking the View Version History link next to the version information. - Workflow Status - The process of initiating and memorializing transactions generally progresses through a series of predefined steps which depend on the type of transaction being processed. The Document Agility system allows an organization's System Administrator(s) to define a custom list of statuses for each transaction type. A Transaction Creator user can set or change the workflow status of a particular transaction, by clicking the "Change Status" link. This link will be available provided that 1) workflow statuses have been created for the given transaction type, and 2) the user is the current Owner of the transaction. Using workflow lists is optional. If your organization does not use workflow lists, or no workflow status has been specified for the transaction, you will see "Not Specified" in this area and you will not see the "Change Status" link.
The Document Agility system allows an organization's System Administrator(s) to define a custom list of statuses for each transaction type. You can set or change the workflow status of a particular transaction from among the statuses provided by your System Administrator(s). Click the Change Workflow Status link, then select a status from the selection box and click the Save button. If you do not wish to make any changes, click the Cancel button.
- Created For - The Document Agility system uses the convention that each transaction is created for a specific situation - whether it is a client, customer, vendor, transaction, matter, etc. When a transaction is created the user has the option of specifying a customer for which the transaction is being created. These choices can be created by your organization's System Administrator(s) or imported in advance. Using this area is optional. If your organization does not use the Created For functionality, or no entry has been specified for the transaction, you will see "Not Specified" in this area.
The Document Agility system uses the convention that each transaction is created for a specific client, customer, transaction, etc. When a transaction is created you have the option of specifying the customer for which the transaction is being created. To change the customer, click the Edit button, then select an item from the selection box and click the Save button. If you do not wish to make any changes, click the Cancel button. - Last Published - The date on which the Transaction was last published - i.e. the date date when the data for gather for the Transactions using Interviews was made available to your account's database for use with outside systems and reporting. Publishing is done by clicking the Publish button on this screen (if you have the permissions to see the publish button). Depending upon your accounts Publish configuration, you will be able to publish the data for a transaction manually as often as you want, or you will be able to publish the data only once and from then on the information will be updated whenever Information is changed through the Interviews.
- Transaction ID - The transaction ID is a globally unique identifier for the transaction.
- Last Finalized - The date on which the Transaction was last finalized - i.e. the date when a user clicked the Finalize button to indicate that the transaction or its accompanying documents have been memorialized in some way, such that further changed would generate a new version of all documents and the Interview answers. Finalizing is done by clicking the Finalize button on this screen (if you have the permissions to see the Finalize button).
- System Status - The System Status is a predefined status within the Document Agility application. There are two statuses in which any particular transaction can be - In Progress and Finalized. As described above in the Workflow Status section, transactions have specific life cycles, and the Document Agility system uses a convention of marking transactions as being Finalized in order to indicate that they have been memorialized externally in some way. All transactions begin as In Progress, and once a transaction has been Finalized, the System Status of a transaction will change to Finalized. Any further changes to the interview after this point will automatically create a new version of the transaction. Because System Statuses are version-specific, after a new version has been created, the System Status will then revert back to In Progress so that the status may be tracked with respect to the latest transaction version.
- Due Date - For each transaction, users may set a due date in the system. Due dates do not have any established processing significance, however they may be used to track which transaction processes are close to their due dates, and they may be used in Document Agility's built-in reporting suite to track transactions nearing their due dates. They may also be used within pre-defined workflow rules to take certain actions based on being within a certain number of days away from the transaction's due date.
For each transaction, you may set a due date in the system, which may be used to track which transaction processes are close to their due dates using Document Agility's built-in reporting suite. To change the Due Date, click the Edit link, then select a date from the calendar picker and click the Save button. If you do not wish to make any changes, click the Cancel button. - Data Set - Displays links (if you have the required permissions) to view or download an XML representation of the data that has been collected in all Interviews to date for the given Transaction.
Deleting a Transaction - To delete a Transaction, click the Delete Transaction button above the General Transaction Information section. You must have the required permissions in order to see this button. Deleting a Transaction will remove all of its various aspects, including generated documents, Data Sets, history information, etc. This action cannot be undone.
![]() WARNING - Deleting a transaction cannot be undone.
WARNING - Deleting a transaction cannot be undone.
Workflow Options
In the Transaction Details screen, you can take several actions that affect the workflow of the transaction on which you are working. In order to perform workflow actions on a transaction, you must be its owner. This is done by Taking the Transaction, which can be done either from the My Workspace screen or from within the Transaction Details screen (as described below).
 TIP - In order to perform workflow actions on a Transaction, you must be its owner. This is done by Taking the Transaction (as described below). TIP - The actions you can perform on any given transaction may vary based upon the transaction type and your user permissions.
- Take and Release - If the transaction is unassigned in your User Group (neither you nor any other user is the owner of the transaction), you will see the Take button. When you take a transaction you become its owner and are the only user that is able to perform actions on the transaction. To take the Transaction, click the Take button, then click Take in the popup box that appears.
If you are already the owner of the transaction, you will see the Release button in your Workflow Options area. When you release a transaction, you make it available again to other users within your User Group, and any user within your group may then take the transaction. To release the Transaction, click the Release button, then click Release in the popup box that appears. - Assign - If you are the owner of the transaction, you may see the Assign button in your Workflow Options area (depending upon your User Group's permissions for the Transaction type). Assigning a Transaction sends the Transaction to another User Group. If you have completed all of your required actions on a given transaction, you may use Assign to select a User Group to which to forward the transaction for further processing. Once you have assigned a Transaction, it will appear in your Recent Transactions grid and, although you can view the Transaction, you will not be able to perform any actions on it (except for generating Documents for it).
To Assign the Transaction, click the Assign button. In the popup that appears, select a User Group to which to forward the Transaction, enter a message in the Required Action text box, then click the Assign button. - Finalize - If you are the owner of the transaction, you may see the Finalize button in your Workflow Options area (depending upon your User Group's permissions for the Transaction type). Marking transactions as Finalized can be used to indicate that they have been memorialized externally in some way - sent to a regulatory agency, signed by a client or vendor, etc. Once the System Status of a transaction is marked as Finalized, any further changes to the interview will automatically result in the creation of a new version of the transaction. When a new version of a transaction is created, the existing interview answers and all existing documents for the previous version are stored.
To mark a Transaction as Finalized, click the Finalize button, then select a folder into which to place the Transaction, and finally click Finalize button in the popup box that appears next. Even though you have placed the Transaction into a folder, the Transaction will still be visible in your Recent Transactions gird in your My Workspace page. - Publish Data Set - If you are the owner of the transaction, you may see the Publish Data Set button in your Workflow Options area (depending upon your User Group's permissions for the Transaction type). When you Publish a Transaction you are indicating to the system that the answer data inside of its Interviews (referred to as the Data Set) is ready to be externalized and made available for reporting and possible data exchange with other business systems. Publishing the Data Set cannot be undone, since published information may be immediately used within published reports by other users of the system.
To Publish the Data Set of a Transaction, click the Publish Data Set button, then click Publish in the popup box that appears next.
- Continue Interview or Redraft - If you are the owner of the transaction, you may see a button to access the transaction's Interview that is either labeled Continue Interview or the Redraft. in your Workflow Options area (depending upon your User Group's permissions for the Transaction type).
If the Transaction has a system status of In Progress, then this button will be labeled Continue Interview. Clicking the Continue Interview button will allow you to access your Interview for the Transaction in order to answer additional questions or make changes to previous questions.
If your Transaction has a system status of Finalized, then this button will be labeled Redraft. Clicking the Redraft button will also allow you to access your Interview for the Transaction, however a new version of the Transaction will be immediately created, and the prior version of the Transaction will be stored (this includes the prior answers to the Interview questions and all previously generated documents). - Required Action - Depending on whether or not the Transaction was originally created by your User Group or was assigned to your User Group, there may be instructions listed in the Required Action area. These instructions would have been input by the previous User Group working on the Transaction and indicate next steps for processing.
- Complete Segment (available only if your organization is using Workflow Rules) - If your organization is making use of the systems workflow rules capability to preset the flow of transaction steps between User Groups, the Complete Segment button will be available to you. Once you have completed your required activities for a particular Transaction, you would click the Complete Segment button to indicate to the system that your work is complete, so system can automatically assign the Transaction on to the next Group and possibly perform other actions on the Transaction.
Available Documents for the Transaction
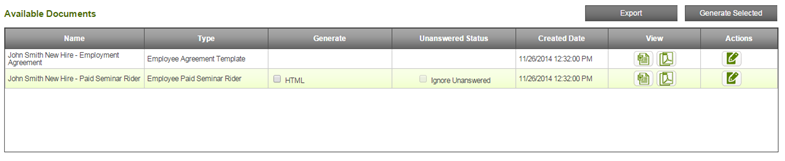
This grid displays the documents that are available for the Transaction based upon the data collected through the Transaction's interviews. Available documents for a given Transaction are preset by your organization's Content Provider. Depending on your permissions, the grid allows you to generate documents in available output formats, view documents that have already been generated, see information about the template that create the document, and export one or more of the generated documents to other people or systems.
 TIP - The Available Documents grid displays all documents that are available to be created for the given Transaction based on the data collected about the Transaction and based on your role in the transaction and you permissions to view and/or generate them.
TIP - Because documents in the list are available does not indicate that a particular document has already been generated. Documents which have been generated will have viewing links in their View column.
The list of documents you see will depend upon your document viewing permissions. Additionally, the current answers provided during the Transaction's interview may determine which documents are currently available for generating or viewing. The information in the Available Documents Grid includes the following items:
- Name - The name of the Document.
- Type - The type of document.
- Generate - If your User Group has document generation permissions for a particular document, you will see links to generate the document in the output formats available to you, which may include Microsoft Word, PDF or HTML. If your User Group does not have document generation permissions for a particular document, you will see the words "View Only". Once a document has been generated in a particular format, any subsequent change to the interview questions will cause the document to be automatically regenerated.
- Unanswered Status - If your User Group has document generation permissions, you may also have the further permission to be able to generate a particular document while ignoring unanswered questions. By default all answers required for producing a particular document must be supplied during the interview sessions in order for that document to be generated. However, by using the Ignore Unanswered option, you will be able to generate a document even when all required information has not yet been supplied. This may be useful for viewing preliminary version of a document prior to having all information required to complete it. Once a document has been generated with unanswered questions, it will be automatically regenerated any time the answers to the interview questions are changed. Whenever there are unanswered questions remaining in the interview for any available document, those questions will be indicated by the use of red text for the question prompt.
This column may also contain a yellow warning triangle icon to indicate the number of unanswered questions if you attempt to generate a document and required information for document generation is has not been provided in the Interview. PLEASE NOTE: The system displays unanswered questions in two fundamentally different. When working within an Interview, after you come to the last question, the system will display a popup box that may give you the number of questions you left unanswered - i.e. questions that were not given an answer in the Interview without regard to whether they are required to produce a given document.
This may be different than the number of unanswered questions displayed when you attempt to generate a given document and see a yellow unanswered triangle icon appear indicating unanswered questions that are actually required to produce the given document. - Created Date - The date and time at which the document was created.
- View - The View column presents links for each of the permitted output formats. To view a document, click the link corresponding to the desired document an output format. If your User Group's permissions do not allow you to generate a particular document, and you do not currently see any viewing links for the document, you must wait until the document is generated by another User Group with generating privileges for the document.
![]() WARNING - If your document generation/viewing permissions permit your to only view a document and only in a specific format, then in order for you to see that document, a user with document generation permissions must first generate that document in the specific format in which you can view it.
WARNING - If your document generation/viewing permissions permit your to only view a document and only in a specific format, then in order for you to see that document, a user with document generation permissions must first generate that document in the specific format in which you can view it.
- Actions - The Actions column presents an icon
 to rename the document if the document has already been generated.To rename the document, click the icon and the Rename Document popup will appear. Edit the name of the document in the text box and click the Save button to save your changes.
The Actions column also presents an icon to view all versions of the document, if the document has more than one version (i.e. if the Transaction is in its second version or beyond). To view document versions, click the icon and the Document Versions screen will appear. For more information on viewing document versions, see the Viewing Document Versions section below.
Viewing and Comparing Document Versions
The Document Agility System tracks versions for all documents produced for a Transaction. Documents versions are identical to the version of the Transaction of which they are a part. New Transaction versions are created when a user chooses to Finalize a Transaction (see the Finalizing topic above on this page) and afterwards an Interview is accessed by any User by clicking the Redraft button. This action will create new versions of all of the current documents for the Transaction as well.
When a document is generated in DOCX format, the system embeds a globally unique ID (GUID) into the document to identify it as a specific document created in Document Agility. A DOCX document created on the system can then be manually edited and uploaded to the same Transaction as an Ancillary File, where it will be recognized by the system and will appear as the latest version of its matching system document.
 TIP - Document versions are usually identical to Transaction versions. However, if questions in an interview for a later version of a Transaction are answered in such a way that a new document is generated for the later transaction version, the document version may no longer be in sync with the Transaction version.
Document Agility handles this situation in the following way: If questions in the interview for version 2 of a Transaction are answered such that a new document is generated for transaction version 2, this new document's version will be indicated as version 2, even though it is the first time the document has been generated.
To view the prior versions of any individual document in a Transaction, click on the View Document Versions icon . You will then see the Document Versions screen.
The Document Versions screen displays the current and all prior versions of the selected document. The information in the Documents grid includes the following items:
- Version - The version number of the Document (in descending order).
- Created - The date and time the Document version was created.
- Template (Version) - The Template (and version number of the Template) that created the Document.
- Create Method - The method by which the Document version was created.
- System Automation - Indicates that the Document version was created by the standard operation of Document Agility system as interview answers are run against rules templates to create a Transaction-specific document.
- Manual Edit (Not Yet Available) - Indicates that the Document version was created when a Document created in Document Agility was exported and was then manually edited (Word DOCX format Documents only) and uploaded to the Document Agility system.
- View - The View column presents links for each of the available output formats for which you have permissions to view. To view a Document version in a particular format, click the link corresponding to the desired document and output format.
If there are DOCX formats of a document created for both a document version and its immediately preceding version, a Compare to Previous Version icon will appear next to the viewing links for the document version. Clicking this link will display a redline comparison document (in DOCX) showing the differences between the text of the two document versions being compared.
TIP - The Available Documents Grid always displays the Documents for the current version of the Transaction. To view prior versions of documents, use the View Document Versions functionality described above.
Exporting Documents
Depending upon your User Group's permissions, you can export one or more of the generated documents for a Transaction.
To export documents from a Transaction, click on the Export Documents button above the Available Document grid. You will then see the Export Documents screen.
The Export Documents screen displays various methods, depending upon the options available for your organization, by which you can export Transaction documents. The available choices include (depending upon your organization's available export options):
- Emailing Documents - You can send one or more documents in a Transaction to an email recipient along with a custom email message.
To email documents to a recipient perform the steps below:
- Select Documents - In the grid displaying the available documents for the transaction, select your desired combination of documents/output formats to export. Document names appear in the "Names" column, and the available output formats appear in the "Format" column.
- Select "Send to Email Recipient" as the Export Method - Click the radio button for "Send to Email Recipient", then complete the following information:
- Email Address - Enter the recipient's email address
- Subject Line - Enter a subject line for your transmittal email
- Email Body - Enter a message for your email. By default, the transmittal email will a message containing your organization's name, the name of the Transaction, and information on how to access their account. The email message you type here will be included as an additional message in the transmittal email.
- Export - Click the "Export" button to complete the emailing process. You documents will be send as individual attachments to your transmittal email.
- Select Documents - In the grid displaying the available documents for the transaction, select your desired combination of documents/output formats to export. Document names appear in the "Names" column, and the available output formats appear in the "Format" column.
- Placing Documents in an External User's Workspace - You can send one or more documents in a Transaction to an External User's workspace where that user can log in and review them. Documents for a Transaction can be shared with any External User within the Account with which the Transaction is associated.
To place documents in an External User's workspace, perform the steps below:
- Select Documents - In the grid displaying the available documents for the transaction, select your desired combination of documents/output formats to export. Document names appear in the "Names" column, and the available output formats appear in the "Format" column.
- Select "Place in External User Workspace" as the Export Method - Click the radio button for "Place in External User Workspace", then complete the following information:
- Select User - Select the External User into who's account you wish to place the selected documents. Available External Users are those who are part of the External Account connected with the Transaction.
- Optionally Select an Expiration Date - If your wish, you can set a date by which documents you place in a User's Workspace will automatically removed. To set an expiration date, check the "Expires?" checkbox and enter a date in the date selection box.
- Export - Click the "Export" button to complete the process of placing the documents in the selected User's workspace.
- To remove documents that have been previously placed in an External User's workspace, navigate to the Transaction Details screen and select the Remove icon in the row of the "Collaborate with External Users" grid corresponding to the document you wish to remove. In the popup box that displays, click "Remove" and the selected document will be removed from the User's workspace.
- Select Documents - In the grid displaying the available documents for the transaction, select your desired combination of documents/output formats to export. Document names appear in the "Names" column, and the available output formats appear in the "Format" column.
TIP - When placing documents in an External User's Workspace, the list of available External Users is limited to Users that are within the External Account that associated with the Transaction.
Transaction History
The Transaction History grid displays the history associated with the Transaction. Each time a User performs any action on the Transaction, information about the action is recorded, including:
- Item - The name of the action that has been taken. The system records the following types of actions affecting transactions:
- Starting an Interview
- Completing an Interview
- Editing the Name of the Transaction
- Changing the Workflow Status
- Changing the Created-For Account
- Changing the Due Date
- Completing a Work Segment
- Taking a Transaction
- Releasing a Transaction
- Assigning a Transaction
- Finalizing a Transaction
- Generating one or more Documents
- Redrafting the Transaction
- Emailing the Transaction's Document(s)
- Sending an Email from the System about the Transaction
- Publishing the Data Set
For completed Interview history entries in which the system detects that an answer to an Interview question was changed, the History grid will display a View Changes link in the Details column. Clicking this link allows you to see detailed information about the exact changes made to the Interview questions in the given Interview session. - Details - Additional information about the action taken. For example, if the Transaction was assigned, the Details column will display the User Group to which the Transaction was assigned.
- User - The name of the User who performed the action.
- Date - The date on which the action was performed.
Transaction Notes
This grid displays notes that any User who has accessed the Transaction may attach. Notes are a helpful way to either communicate information about the Transaction to other users or to store information with the Transaction. The grid displays information about each note, including:
- Note - The name of the Document, which is pre-set by your organization's Content Provider.
- User - The name of the User who composed the note.
- Date - The date and time at which the note was composed.
- Actions - This column presents options for editing or deleting the note, if you are the User who composed the note.
Composing a Note - To create a Transaction Note, click the Compose Note button above the Notes grid. Enter your note and click Save. If you do not wish to enter a note, click the Cancel button.
Editing a Note - To edit a Transaction Note, click the Edit icon in the appropriate row of the Notes grid. Modify the note and click Save. If you do not wish to make any changes, click the Cancel button.
Deleting a Note - To delete a Transaction Note, click the Delete icon in the appropriate row of the Notes grid, then click Save. If you do not wish to delete the note, click the Cancel button.
TIP - A note may be edited or deleted only by the User who composed it.
Ancillary Files
The Ancillary Files grid displays additional files that Users have uploaded that are related the Transaction. Uploading Ancillary files is a convenient way to store associated documents, images, specs, forms, certifications, etc. that pertain to the Transaction's business matter. The grid displays information about each Ancillary File, including:
- File Name - The file name of the uploaded file.
- Description - A helpful description to identify the file.
- Uploaded By - The name of the User who uploaded the file.
- Upload Date - The date and time at which the file was uploaded.
- Actions - This column presents options for viewing or deleting the file.
Uploading an Ancillary File - To upload an Ancillary File, click the Upload Ancillary File button above the Ancillary Files grid. On the next screen that is displayed enter a screen name description for the file, click the Choose File button and select the file from your computer's drive using the file selection box that is displayed, the click the Open button. Next click the Upload button to upload your file. If you do not wish to upload a file, click the Cancel button.
Uploading a Manually Edited DOCX Derived from a System Document - The Document Agility system supports tracking manually edited versions of a document created initially though interviews and system automation. Manual editing of document text is frequently required in the process of final negotiating for many types of transactions.
To support tracking manually edited version of a document, Document embeds a globally unique ID (GUID) into each document generated in DOCX format. After creating a draft DOCX document on the system, a user can then manually edit the document's text and upload the document as an Ancillary file within the Transaction to which it belongs. The document Agility System will identify it as a continuation of its matching system document, and it will appear as the latest version of the matching system document. After the upload is performed, the user will have no ability to generate the matching system document in any other formats, and the matching document will also not be re-generated again even if the interview changes or a new version of the Transaction is created.
TIP - If you upload an ancillary document that is a DOCX file derived from a system document, it will become the latest version of the matching document, and you will have no way to modify the matching original system file through interviews or generate it in any previously remaining formats.
![]() WARNING - If you are uploading a manually edited version of a system document as an ancillary file, you must upload it within the Transaction to which the matching document belongs. The system will not allow uploading of such an ancillary file within a different Transaction.
WARNING - If you are uploading a manually edited version of a system document as an ancillary file, you must upload it within the Transaction to which the matching document belongs. The system will not allow uploading of such an ancillary file within a different Transaction.
Viewing an Ancillary File - To view an Ancillary File, click the View icon in the appropriate row of the Ancillary Files grid. Depending upon the file type you are viewing and your browser's installed viewer extensions, your file will either be downloaded to your computer or displayed in a separate browser window.
Deleting an Ancillary File - To delete an Ancillary File, click the Delete icon in the appropriate row of the Ancillary Files grid, then click Save. If you do not wish to delete the file, click the Cancel button.
TIP - You must have the required permissions to upload or delete Ancillary Files.
Comments
0 comments
Please sign in to leave a comment.